Saturday, November 29, 2014

YOU did this!!

I blame all of YOU for this!!
Yes, YOU, with all your talk of confounded new-fangled 3mm Napoleonics. You know full well that I'm an addict!! You have NO business whatsoever in chattering away like magpies on TheMiniaturesPage.com about the gorgeous sculpts and the bright colors and the stunning mass effect!! YOU, I say! YOU are at fault for this next order I make to Picoarmor!!
I see you all hiding there behind the sofa! And you, the one in blue! Sheepishly staring at your shoes won't help matters!

Mrs History PhD will have my scalp for this!! I hope you're all happy now!!
Heads will roll! I am NOT taking the fall for this all by myself!!

Thursday, November 27, 2014

Happy Thanksgiving to everyone!!


Actually, mine looked like this:
Thai turkey lettuce wraps!  Mrs. PhD is as good at cooking as she is at painting! Watch out for that red sauce! It's like Hiroshima in a bowl!!

I hope you all have a great day and eat far too much! 

To my followers outside the U.S., don't worry! Eating a large meal of roast turkey with all the trimmings on the last Thursday in November is a basic human right! Please speak with the nearest ex-pat American in your country and an invite to eat will be forthcoming! 

Back to painting tomorrow! 

Saturday, November 22, 2014

Polish Fitter A's this time!

I've run out of Wargame Accessories steel bases and given that next week is Thanksgiving, I imagine the ones that I've ordered won't arrive until the following Monday. So this weekend, I didn't get much painting done, but I did manage to finish two Polish Su-7B Fitter A ground attack aircraft: 

In the early 1980's, the Soviets and the Poles were in the process of replacing the Su-7B (with the Su-17/Su-20), but it wouldn't be fully retired until 1990. The vast majority of Polish Su-7B's seem to have been in a plain aluminum finish:
Only a few were painted overall very light gray (as in the top photo), and since it was unusual, that's what I've chosen:

The Su-7A was an interceptor and entered service in 1958, but was not wholly successful and just under 200 were built. It was retired in 1965, having been replaced by the MiG-21. The Su-7B was the main Soviet ground attack aircraft of the 1960's. It entered service in 1961 and was also never seen as an entirely satisfactory aircraft, as the operational range was fairly short at just 1025 miles (980 km) and it had a very limited payload of only 4400 lbs (2000 kg). Despite this, 1,650 were produced. The aircraft's shortcomings drove the development of the Su-17. 

More from me during or after the long holiday weekend!

Saturday, November 15, 2014

Polish Fitter C's and Soviet Hinds

I've been feeling in a bit of a 3mm rut lately, what with churning out loads of East German and Danish vehicles over the last 3-4+ months, so the aircraft binge I've been on lately has felt pretty good. I'll have to get back to vehicles, as there's still so much to get done, but I'm in no huge hurry. That being the case, I've been working on my first Polish fixed wings, as well as my first Soviet helicopters. 

First up is a Polish Su-20 Fitter C, it being one of the export versions of the Soviet-built Su-17 ground attack aircraft:
As you can see, some squadrons painted the air intake cone red and others used green. For no particular reason, I opted for green. Here's my rendition:
I never apply decals to the undersides of the wings. At 1/600, these little guys will only ever been seen from above, so it's a waste of effort and decals to put them on the bottom. When doing this Su-20, something I've seen a thousand times, but never really thought about, hit me. Cold War Polish aircraft had national insignia on each side of the fuselage and each side of the vertical stabilizer (the "tail"), but none on the upper surfaces of the wings! Lower surfaces, yes, but not the tops:
That seems odd to me. Perhaps that's been changed since Poland joined NATO? Also, as an added aside, from 1918 until 1993, the Polish checkerboard insignia was always presented with a red square in the upper left-hand corner (as viewed). In 1993, this was changed to a white square in the upper left, as a break from the Communist era. 

Next, I've added two Soviet Mi-24 Hind F gunships to my growing aircraft collection. The real thing:
And mine:


The Hind D entered service in 1973-74 and had a four-barreled 12.7mm Gatling gun mounted on the chin:
However, very early in the Soviet involvement in Afghanistan, it became blatantly obvious that the weapon did not pack a heavy enough punch. Beginning in late 1981, the Hind F entered service, which replaced the machine gun with a twin-barreled 30mm cannon:
In reality, the Hind F became operational in the autumn of 1981, but for my purposes, I'll assume that the Soviets pushed this forward by a few months, knowing that war with NATO was imminent. 

Ok, I'm headed back to the painting desk. More 3mm goodness from me soon!

Saturday, November 8, 2014

Making 1/600 scale forests

I've been mulling over 3mm terrain for the past ten days or so and my thoughts have turned to how to model forests. Earlier this year, on TheMiniaturesPage.com, one of my favorite posters gave this tutorial

When looking down onto his finished product, it certainly looks good:
Basically, foilage clusters embedded into latex glue, which he then cured in a warm oven. Great idea! But it's relatively two dimensional, i.e. it has very little height to it. Certainly in comparison to a 1/600 scale tank, it's not nearly tall enough to represent appropriately scaled trees. It looks more like an area of rather large bushes. Another problem for me is that when a unit is "inside" the forest, I would either have to sit it on top of the "trees" or drape the entire latex forest over the unit. Both options seem quite clumsy and aesthetically unpleasant to me.

So, what I want is a forest that has height to it, can be neatly set over the top of my ground units, and looks at least reasonably like trees. Hmmm....

Here's what I've come up with. I cut a small randomly shaped piece of sheet styrene that was thick enough to be quite rigid. I clipped the tips off of some thin gauge 3/4" brads (very small nails):
I then drilled holes through the styrene at regular intervals all the way around the edge and I superglued the clipped nails through the holes thus forming what Mrs. HistoryPhD says is a "Barbie table".
(That one's for you, sweetie.)

I then gave the whole thing a shot of light grey primer and the "table top" got several coats, top and bottom, of a dark green granny paint (Apple Barrel's Hunter Green - it's cheap but it doesn't cover very well), while the "trunks" got two coats of Vallejo London Grey (836), because tree trunks are never actually brown. 

I drilled a hole through the center also, but I discarded the central leg as it made it more difficult to sit the "forest" over the top of a unit. At first, I just drilled holes in the four corners, but it wasn't enough "trunks" to resemble a lot of trees, so I added more. It's not possible to cut every nail the exact same length, but it sits quite stable, so it's not really an issue. Not all the legs are absolutely perpendicular, but then not all trees grow arrow-straight either. This is where it stopped being easy.

The next step was hot-gluing varied shades of foilage tufts to the top and edges of the "table":

On the bottom side, as an experiment, I used PVA to glue the tufts on. PVA doesn't leave a million, extremely annoying, little threads of glue hanging EVERYWHERE, however, it doesn't hold the tufts on worth a damn. Hot-glue, on the other hand, is a literal nightmare!! It holds the foilage on very sturdily, but there is honestly not one surface in our apartment that isn't now covered with gossamer glue threads. Mrs. History PhD has forbidden me to ever use a glue gun again!

So, lessons learned: 1) "Forests" need to be fairly large. This small one that I made as a test platform is a bit tight to fit over the top of a unit. 2) Use fewer "trunks" and spread them out farther from each other. If they're too close together, they look very good as a forest, but it makes it difficult to fit it over the top of a unit. 3) Use an adhesive other than PVA or hot glue (maybe latex "tacky" glue?) and use very small tufts for the forest's bottom side. In future, I may just use coarse flock on the bottom side. I think 3/4" nails are slightly too long scale-wise, but it makes it easier to sit the forest on top of things.

Not expensive to make and I think it looks fairly realistic and it's certainly functional. What's your solution to this issue?

More next time!

Wednesday, October 29, 2014

Hinds and Super Sabres

I seem to still be in my "let's paint loads of aircraft" phase, so my latest efforts have been geared toward that end. I've finished my first Polish aircraft, two Mi-24 Hind D's:
And here is my rendition of the Poles, as well as an East German one that I did, as I was already painting Hinds anyway:

I've also finished off two of Marcin's none too impressive F-100's for my Danes:
I didn't make mine nearly as "distressed" looking as the real ones were by 1981:
The usual apologies for the photo quality. One day I'll decide to spend money on a camera instead of the equivalent amount on minis. 

As I said in my last post on the subject of Danish F-100's (10/21/2014), they'll look ok on the tabletop, but I'm not very happy with the sculpt or the mess that was the aft end of the mini. 

All Denmark's aircraft had a national flag painted on the horizontal stabilizer ("tail"), but that's far too tiny for me to attempt to freehand it. I looked at a lot of Danish F-100's on Google and they all had the wing roundels a surprisingly long distance inboard on the wing, i.e. a long way away from the wing tip, so I've duplicated it on the models. It looks a bit strange to me, but it is correct.

More from me next time!

Sunday, October 26, 2014

Cold War reading list, Part 2

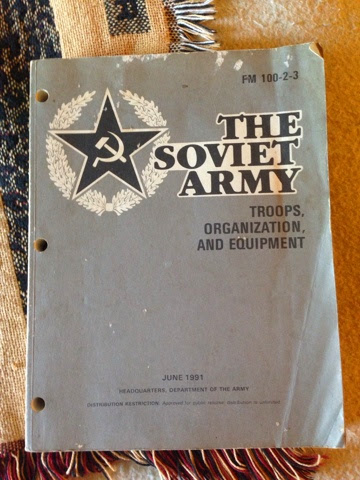
Another indispensable title for a Cold War bookshelf is US Army field manual FM 100-2-3:
It was reissued periodically between 1946 and 1991 (and possibly beyond that, but that was after my time in the Army). It is an outstanding guide to Soviet military tactics, weapons, and vehicles. A definite "must have".

As you can see, mine is the 1991 edition. Given my timeframe of interest, I would much rather have the 1977 or the 1984 edition. Anyone want to trade? Mine's in pretty good shape!

Tuesday, October 21, 2014

Very unimpressed with Marcin's F-100's

The O8 F-100 Super Sabres that I've been waiting on arrived from Picoarmor today. The usual wonderful service from John and John and the usual pathetic delivery time from the Post Office. 

Having now gotten to work on the aircraft, I have to say the sculpts are pretty poor quality and far below Marcin's usual standards. They come in two pieces. The fuselage and tail assembly in one piece, which gets glued across the wing assembly, it being a second piece. The rudder has a very large piece of mold seepage and is a fair bit of a mess. The horizontal stabilizers are not level and of noticeably different shapes and lengths:

In the end, in order to get at the "blob" attached to the rudder, I had to snap off the entire vertical stabilizer. This is what it will look like once I get it glued back on:
As you can see, I have yet to finish filing it into the correct shape. 

I'm quite disappointed with these little models. They require an inordinate amount of work compared to their small size. No doubt they'll look fine on the table and from a distance and paint covers a multitude of sins, but still.... Ok, I realize this isn't 1/48 and I got two for only $1.85, but that's not the point. Sigh, usually Marcin's stuff is very impressive. Not this time. 

Ok, back to the maintenance shop. 

Saturday, October 18, 2014

The Royal Danish Air Force in 1981

To continue on with the aircraft theme that I seem to be in lately, I thought I'd look at what minis I'll need in order to represent the ground attack aircraft of the Royal Danish Airforce (Kongelige Danske Flyvevåben) for my 1981 LANDJUT campaign. 

For interceptors, the Danes used the F-104G Starfighter, 
which they had the good sense NOT to press into service as a ground attack aircraft, thus avoiding the morbid "lawn dart" and "tent peg" jokes the West Germans had to suffer through. Even so, the Danish F-104 loss rate was 23.5% (12 out of 51). Oddly, the Norwegians, who also used them only in the interceptor role, lost only 6% and that in a country known for harsh weather! Oh! I just remembered another German joke - "What's the definition of an optimist? A Starfighter pilot who quits smoking." Ahem...well...moving right along....

The Danes relied on two aircraft types for their ground strike capability. The older of the two was the American-built F-100 Super Sabre, both the single seat D model:
And the two seater F model:
The Danes had been using the Hun since 1959 and it wouldn't finally be retired until 1982. Despite it's age, it could still pack a wallop with a 7000lb (approx. 3200kg) payload, although how effective it would've been over a modern battlefield against an enemy well supplied with up-to-date, shoulder-fired SAM's is debatable. 

The second strike aircraft used by Denmark was the Saab F-35 Draken; the single seat strike version:
Some of which were modified with chin cameras for an added reconnaissance role, the RF-35:
As well as some twin seat TF-35 trainers, normally unarmed, but which could easily be adapted for reconnaissance and strike roles:

Prior to the RF-35 reconnaissance Drakens, the RDAF used RF-84F Thunderflashes:
However, they were all retired in 1971 when the Drakens took over. Though they were kept in reserve for a few years, they were gone by 1981. I quite like this aircraft for some reason, so I may get just one, reasoning that a few might still have been in mothballs and pressed into service for the war emergency. Sounds plausible to me. The version available from O8 is the blunt-nosed fighter version, the Thunderstreak, like this West German one:
So I'd have to round the nose off with green putty. We'll see if I decide to get one. 

And lastly, in 1980, both the F-100's and F-104's began to be retired and replaced by the new F-16A's that Denmark started buying from the US:
These served as interceptors, ground strike aircraft, and in the reconnaissance role. In time, even the Drakens would be retired in their favor.

As you can see from the above photos, throughout the 1970's and up through 1983, all RDAF combat aircraft, save only the new F-16's in their three-tone grey scheme, were in overall gloss (except for the old Huns) olive drab green, for which, Humbrol 155 is an exact FS match. 

And here are my first Danish fixed wing aircraft; two Drakens:
Danish markings courtesy of  Dom's Decals. As usual, because the minis are suspended on a wire, it's difficult to get decent shots of the little devils.

Two F-100 D's should arrive in the mail on Monday and I have a pack of F-16's as part of the next order I'll be placing, so stand by for more!