Saturday, September 28, 2013

The zen of painting 3mm

In the last several months, since I began a headlong plunge into 3mm, I've noticed a few things unique to miniatures in this scale, so I thought I'd give my opinions on painting in 1/600. 

The first thing is that you have to stop thinking about individual miniatures. You're not painting AN Italian tank:
Instead, you're painting an Italian armored battalion:

One of the strengths of this scale is that the minis will rarely, if ever, appear singly. In 6mm and bigger, each model is perceived as an individual, even if it represents more than one actual vehicle. In 3mm, vehicles are used and perceived in the collective sense. You see platoons or companies or battalions, but not individuals. And your painting style needs to reflect this. 

As I've said before, at this small scale, the vast majority of detail work is totally wasted effort. Remember these minis will be on a wargaming table and 3-6 feet from the eye. All your intricately painted detail will never be seen. I go for the vehicle's overall color, any basic camouflage pattern (and I do mean BASIC!), and the most obvious details, meaning those that are a drastically different color than the rest of the vehicle (tank tracks, windshields, mufflers, etc). I then give it a strong sepia wash to add some definition, a blast of dullcote, and I'm done.

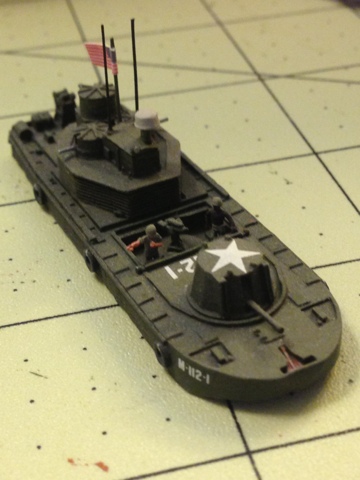
At 1/600, the honest truth is that all license plates, vehicle numbers, unit symbols, painted-on graffiti, headlights, etc would be utterly invisible. However, these tiny guys need a splash of color to catch the eye and help them not blend into the tabletop. As you can see on this M551 Sheridan:

The armored cavalry flag that many units painted on their vehicles should be so small in this instance that it shouldn't be visible, but reality sometimes needs a nudge. Same with the vehicle numbers on these East German T-72's:
Or the white license plate on the front of this Italian Fiat 508 staff car:

In essence, think of yourself as a characture artist. Take the most prominent features of the vehicle and exaggerate them. And remember that you're painting the unit, not the vehicle. 

The idea with the paint schemes on real military vehicles is that they're intended to fade into the landscape. That's the whole point of camouflage!! But for our purposes, you don't want to "lose" your minis on the table. Vary the vehicle's overall color from the color of your bases. Light colored vehicles should have slightly darker bases and vice-versa. I'm too much of a purist to make the difference too flagrant, but a degree of contrast is necessary. 

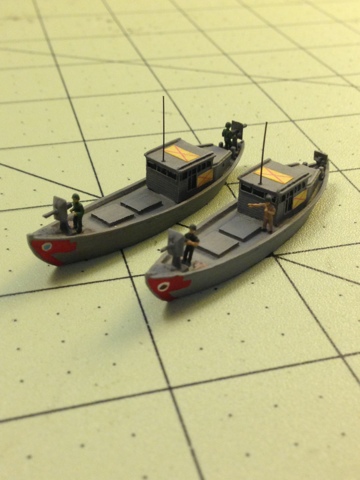
Because gun barrels this tiny wouldn't stand a chance, Oddzial Osmy leaves a metal flange connecting the barrel to the hull. It's pointless to try to remove it. The high aluminum content in the alloy they use makes these minis very hard to cut into or file, as well as being brittle if you do try. So that leaves you with the option of disguising the flange. You can paint it the same color as the vehicle or, what I've chosen to do, paint it black. Black is the color the human eye most readily edits out. Here's some Italian M13/40's:
If nothing else, the black resembles shadowing. 

I guess the basic lesson is don't try to paint tiny individual museum pieces. You're wasting your time. Remember, the minis will be seen as groups and you should be painting for mass effect. Accentuate color contrasts and try to add a splash of bright (but historically relevant) color to each mini. 

More from me next time!!

Saturday, September 21, 2013

The allure of 3mm

I'm having a bit of a laid back weekend and working on getting some basing done, which is neither terribly interesting nor highly photogenic. I received a small shipment from Picoarmor on Thursday which expands my WWII Italians for the campaign I hope to get organized before too long, the ill-fated 1940 Italian invasion of Egypt and the resulting British Operation Compass. Some of the things I got:
65mm infantry support artillery, heavy machine guns, 81mm mortars, and anti-tank rifles. Also, 20mm Breda AA guns and Dovunque 35 trucks, but they didn't make it into the photo. More on all of these as they get painted.  

The Italians, as well as the Germans, used the Swiss-made, German-designed Solothurn 20mm anti-tank rifle. 
Of course, Oddzial Osmy doesn't make it and the only anti-tank rifle they do make is the Soviet PTRD. 
It looks absolutely NOTHING like the Solothurn and it's obvious even at this tiny scale, but I have no other choice. So, the Soviets have been pressed into service as Italians. That's them in the foreground of the top photo.

Given that I'm not doing much that's photo-worthy this weekend, I think it's a good excuse to talk about why I find 3mm so attractive. For me, 3mm has several very strong pluses. In no particular order:

1) You get a lot more bang for a lot less bucks. Let's take my M11/39 Italian medium tanks as an example. If I spend $10 (let's ignore postage here) with GHQ, I get one pack of 5 models. A platoon, plus one tank. If I spend that same $10 with Picoarmor, I get 33 models! That's 2 whole companies, including all the command vehicles, with 5 models leftover (enough for another platoon plus one!)!!! I don't know about you, but that had me sold right there. My monthly hobby "allowance" buys me a whole lot more. 

2) A lot smaller also means a lot lighter and a lot less space taken up. Storage and transportability aren't near the headache that they are with 6mm and bigger. I can store an entire division in a single, small dresser drawer! As I live in an apartment, space is always a prime concern; a thought which Mrs. History PhD frequently avails herself of the opportunity to impress upon me.

3) Painting goes MUCH faster. Visibility of tiny details is very limited in this scale. These little models are stunningly detailed for being so small and it's not that I haven't seen maniacs try to paint it, but honestly, most detail work is wasted effort and completely invisible. It's major colors and major components here. I just pick out the very obvious details, like mufflers, treads, tires, etc. After all, can you see minute details from 3-6 feet on something the size of your little fingernail? I sure can't! The same goes for painting intricate camouflage patterns. It all blends together and your tiny masterpiece looks identical to my block-painted stuff. When it comes to camouflage, I put down the base color and add a few blobs/squiggles in whatever other color(s) necessary and that's all it needs. Additionally, since these models are basically half the size of 6mm, I use up my paint at half the rate. Hobby paints aren't cheap!!

4) The cost of these little gems is so affordable that I can now tackle all those areas of interest that I could never afford before. In bigger scales, my money doesn't go as far, so I'm limited to what projects I can afford to do. With 3mm, I can now go haywire and indulge myself. 1940 Western Desert is in the works. Next might be 1940 Italian invasion of southern France or maybe I'll try Jena or Stones River. Who knows?  These little models open up vast areas of interest that I never thought I'd get to explore. 

If you've tried 3mm or just thought you'd like to, a) I urge you to give them a try if you haven't and, b) if you have, I'd love to hear your reasons for liking them. 

More from me next weekend!!


Saturday, September 14, 2013

The Brown Water Navy

Late 1967. Deep in the Mekong Delta, the US Navy's riverine warfare craft ply the multitude of small waterways that criss-cross the Delta, delivering troops of the US Army's 9th Infantry Division and supplying them with fire support.

I thought this weekend I'd spotlight the riverine warfare craft that I use with Too Fat Lardies' rules, Charlie Don't Surf (an outstanding rules set, btw). So here we go with my primarily GHQ 1/285 force, though there are a couple of 1/300 Amphibmods (It's a one man operation and he has no website, just an email) thrown in. First off are ATC's (armored troop carriers) or "Tango boats". Here's a real one:
And a couple of mine:

Now a command and control monitor or "Charlie boat".  A real one:
And mine:

A real monitor:
And my version:

Refueler boat or "Romeo boat":

An earlier type flame-thrower or "Zippo boat":

PBR II's:

LCM-8's or "Mike boats":
I've scratch-built an artillery platform and a helipad that sit in the welldecks and are removable. 

South Vietnamese Navy Yabuta boats:

I'm also working on a 105mm fire support monitor, a PCF "Swift boat", two more ATC's, an ASPB, and my pièce de résistance, a water cannon or "Douche boat":

More as projects reach completion!

Saturday, September 7, 2013

Desert bases, plus odds and ends

Another weekend is upon me and my shipment from Picoarmor arrived, as well as one from Heroics & Ros, which included a very cool Timecast 6mm German church.
That's the painting supervisor and head of security in the first photo. 

My Picoarmor order included Italian M13/40's, Bersaglieri infantry, British QF 2pdr anti-tank guns, and French 25mm Hotchkiss anti-tank guns, which the Italians used in some numbers in North Africa. It seems appropriate to talk about how I go about making my desert bases. 

I start off with a thin metal base from Wargame Accessories and glue down anything that has it's own base, then I prime it. 
These are the Hotchkiss 25mm's. Anything that doesn't have it's own base will sit on top of the finished sandy base, not be imbedded in it. Now I liberally coat the base with undiluted PVA glue (Elmer's). 
Then I use an old paint brush to push the glue evenly around the base, making sure it's right up to the edges of the miniatures. 
After a new house was built across the street from my apartment, the builders very kindly didn't think it was worth their time to scoop up the little leftover piles of fine sand they'd used to mix their cement, bless their hearts. So I took one of Mrs. History PhD's Tupperware containers and filled it up (kids, always ask your wife's permission before doing this!). I threw in a small handful of cat litter (unused, needless to say!!) and that's my desert material. 
Now I pour a handful over my glued base
And this is what I end up with. As it dries, little gaps open up in the glue/sand mixture, so I fill them in with a touch more glue/sand. Normally, I'd pretty much leave that alone, but as you can see, the bases of the miniatures have to be painted a color that more or less matches the rest of the larger base, which isn't easy because no paint is a good match. Here are some Italian 47mm anti-tank guns:
That necessitates a lot of dry brushing with various different shades of sand, a touch of light gray, and very watered-down patches of pale rust, in an effort to get everything to blend together.
It's a whole lot easier to do bases where the vehicles have no molded-on base of their own and simply sit on top of the sand. A little bit of dark brown earth flock or burnt grass flock and maybe a pale green bush and that's it!

Those are my shirtless Italian anti-tank gunners. A spray with Dullcote and I'm finished. If anyone has more attractive/realistic desert bases, I'd love to know because I'm not 100% satisfied with mine. 

And just to show that I'm not a "one trick pony", here are some Adler 6mm 1806 Saxons I've finished. Dragoons:
Hussars:
And a battalion of infantry:
I haven't textured or flocked the bases yet though. They're based for Baccus' Polemos rules. And a Saxon general who's finished:

That's it for this weekend!


Monday, September 2, 2013

A long weekend of "this and that"

The long Labor Day weekend is here (when I lived in Scotland, it was September Bank Holiday), so I'm trying to catch up on some of the myriad of things sitting half-finished on my hobby table.

I'm just beginning a 1/600 company of Italian M11/39 medium tanks for the 1940 Italian invasion of Egypt. I've also just finished a company of L3/35 tankettes. As usual with my 1/600 stuff, it's all at 1:1.
No command stand for either yet. I always put a couple of infantry on my command stands to represent officers, but I'm fresh out of Italian infantry, so I'll have to wait while more come in the mail from Picoarmor. For my desert bases, I usually stick on a tiny rock or two, maybe a bush, and a patch or two of burnt grass, but I'm beginning to feel it's just a bit too "busy", what with the tanks on there also. 

Finished a Timecast 6mm car garage, though the house and car that will go with it have a while before they'll be finished.

Also, a Z-scale town fountain by Faller. It didn't seem terribly realistic once it was finished per the instructions, so I made a few adjustments, like filling it with Woodland Scenics Realistic Water and creating splashing water with their Water Effects. It came out reasonably well, I think.

I'm also working on converting a GHQ 1/285 river monitor into a 105mm howitzer fire support monitor. 

I've plated over the mortar pit with sheet styrene and created a 105mm turret by cutting off the bustle and most of the gun barrel of an M47 turret, then smoothing off the cut areas. I'm in the process of building a re-bar armor cage for the turret using GHQ's Stryker slat armor (doing which is absolutely fiddly as hell!!). This is what I'm shooting for:
As you can see in the photos of the real thing, the turret actually sat much farther back, closer to the superstructure, but that would require quite an involved conversion. The 40mm turret ring is already cast on the model and it's much easier to fudge reality just a bit and use what's already provided. I'll show you the finished product soon. 

And for my West Germans for LANDJUT 1981, I'm working on some 1/300 Heroics & Ros Green Archer counter-battery radar vehicles and several Mungas from Dragoman on Shapeways.com. As you can see, I've only gotten as far as the base coat of gelboliv. 
3-D printing has a long, long way to go in both product quality and affordability. Having bought several 3-D printed items, I have to say that the quality level is marginal at best and the prices are extortionate for what you get. 

Pretty much an endless supply of other things to show you and talk about, so more next posting!!  Hope you had a good holiday.