Showing posts with label Saxons. Show all posts

Saturday, September 5, 2015

Grenadiers make me go "hmmmmm"

I've been working on some Saxon grenadiers for 1806, which I've painted as Battalion #6 (von Liechtenheyn), and I've run into a fundamental snag. Hmmmm....

For those who may remember my earlier posts on Saxon infantry (Dec 13 and 20, 2014), I painted stands that could represent a company for smaller games and a battalion for larger games. In other words, four stands:
as a battalion (minus the grenadiers and schützen) or one stand:
as the whole battalion. That's both battalions of the Kürfurst Regiment. It seemed a very sound and flexible system to me.  

Now the snag. Most (but not all) armies of the Napoleonic period stripped away the grenadier companies of each infantry regiment and combined them into composite grenadier battalions that served separated from their parent regiments. "All well and good", you say. However, this means that half the battalion has facings of one color and the other half has a different color (for Austrians, it's three different colors!). 

Saxon grenadier battalions had four companies (two from each of its two parent regiments), so in my small game system, I need four stands; two of each facing color, but for my large game system, I need one stand, painted half and half! Damn it! There goes the simple interchangeability. I'm not in favor of having to paint up grenadiers in both systems!

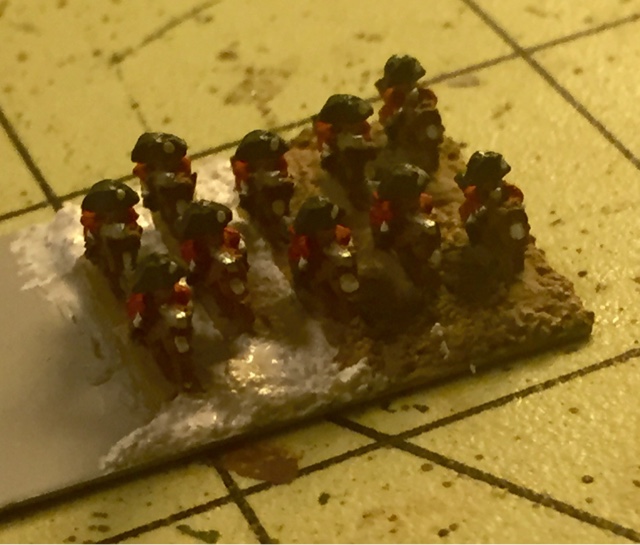
So, I've decided to drop the "one company per stand" and go with just larger games, which is after all the entire reason for doing 3mm. Here's my grenadier battalion:
My only gripe (don't I always have at least one?) is that even at 3mm, it's blatantly obvious that these guys are wearing French-style bearskins. They look nothing like the modified Austrian-style that the Saxons wore:
and certainly not even remotely like the Prussian grenadier cap:
I know these guys are tiny, but come on! There are some things that paint just won't cover up!!

Anyway, the von Liechtenheyn battalion in 1806 was a composite of the grenadiers from the Kürfurst (#1) and von Bevilaqua (#10, the former von Bünau) regiments, faced red and a medium blue. As per the convention of the time, I've put the troops from the senior regiment on the right. 

As this is a long holiday weekend (Labor Day), I'm hoping to get in a fair bit of painting and maybe a second post, if Mrs. History PhD cooperates. I know...."yeah, right."
More next time...maybe. 

Sunday, August 30, 2015

Jack of all trades and master of none

This weekend, I've spent varying amounts of time working on 3mm cavalry, 3mm Cold War artillery, helping Mrs. History PhD with the details of her new FOW Vietnam vehicle, and I was badly bitten by the 1/2400 WWII naval bug (after about three years since the last bite), so I've painted a number of Bay Area Yards' wonderful resin ship bases and dusted off a couple of GHQ ships. All of the above is a very verbose and evasive way of saying I haven't finished a damned thing, despite a considerable amount of time at the hobby desk this weekend! Does anyone else suffer from hobby Attention Deficit Disorder or is it just me?

In any case, here's one of my ship bases:
That's a British Abdiel class minelayer on it. As you'll notice, the stand is finished, but the ship is still in basic 507C light grey. I have yet to shade, detail, and add a camouflage scheme.

And I did manage to finish two squadrons of the Saxon Prinz Clemens Cheveauxleger Regiment for 1806:
Just another three squadrons to go. 

Hopefully, I'll be more ambitious next weekend. See ya!

Sunday, August 23, 2015

3mm cavalry is a real pain in the ass!

This weekend, I've been fiddling with my long-neglected 1806 Saxon chevauxleger regiment. My chosen stand size for Napoleonics, 40mm x 20mm, should each hold two cavalry squadrons. When I have a regiment that needs an odd number of squadrons, I'll do a 20x20 stand as an end cap. 

Unfortunately, O8s cavalry is cast as files of two and not ranks (which would've made basing soooo much easier). So I'm having to go through the slow and painful process of gluing a file to the base and then texturing a thin line next to it, then gluing down the next file:
etc, etc, etc. It's the only way to get into that tiny, narrow space between files. Talk about tedious!! 

But I have discovered that painting 3mm horses is a breeze. This is always one chore that I absolutely detest in 6mm, but here, the details are so tiny that they can safely be slopped over with a suitable "horse colored" paint, of which I have three or four (I can't honestly have all the horses looking identical, now can I?). Stone Mountain Miniatures does a really great line of paints, part of which is an excellent selection of horse colors. 

So, on I go. More on all this when I have a few squadrons that are presentable. 


Saturday, February 14, 2015

Scuds, Frogs, a Hoplite, and a bit of cavalry

This weekend I've again been trying to tidy up several partially completed projects that are littering the wargaming bookcase. 

The first is an East German Mil Mi-2 Hoplite:
The Hoplite entered service in 1965 and Soviet/WarPac forces used it primarily for liaison, reconnaissance, and air ambulance duties. Here's my East German Mi-2:
I've still got a Polish one to go. Unfortunately, once I finished this, I found that the model is literally too small for even my tiniest East German decals. There's just no room for them, so it will just have to go into battle "naked". 

Next up is my very first 1/600 cavalry! I decided to start off by continuing the Saxon theme that I began while doing the infantry a few posts ago, so I chose the chevauxleger regiments:
I specifically wanted to begin with the Prinz Clemens Regiment, but after I began painting these tiny things, I saw that doing the facings was entirely out of the question. Just too damned small!! But then it occurred to me that this was actually a benefit. Rather than have to paint the three individual Saxon chevauxleger regiments, I could use one to represent any of the three! So, here's the finished command stand:
Trumpeter in reversed colors.

As usual, I started out doing the command stand separately so that I could simply switch it out to change what regiment I'm representing. However, at 1/600, the standards of the individual regiments are totally indistinguishable, so the command stand can also be used with any of the units, as long as the trumpeter's color matches. Also as usual, I've deliberately made the pole for the standard overly tall and the standard itself a bit larger than true scale. 1/600 stuff benefits from anything eye-catching. 

And lastly, I'm also trying to finish off the final few stands of Scud B's and Frog 7's that have been lying around "for a coon's age" as my grandma was wont to say when I was a kid:
As with the last time I painted some of these, I went with Vallejo Gunship Green (895) for the missiles themselves. 

Well, that's a few things cleared out of the "to do" pile. Only 5000 things to go! I plan to get it all done in time for my 186th birthday! More BS next time!

Saturday, December 20, 2014

3mm Saxon command stand

I've been tinkering with my 3mm Napoleonics over the last few days. Although these little guys actually paint up quite quickly, I've just been poking along. For me, a hobby is supposed to be leisurely. I already get too much "work" at work. 

I'm not the most technologically adept person in the world (are any academics?), so when it came to the subject of standards for 3mm command stands, I enlisted a bit of help. I had no big problem reducing images to a size appropriate for 1/600, but my home printer's best resolution was still quite grainy and indistinct. Luckily, at work, we have an ultra-high resolution industrial printer and Gerold in the Drafting Dept. was kind enough to give me a bit of his time. I think he was a bit bemused by the tiny flags (he's not a wargamer), but he quickly got them looking quite crisp and professional. Thank you Gerold!

So, without further ado, two companies of Saxons of the First Battalion, Kürfurst Regiment: 
The other two companies are still in the works. Alternatively, they could represent the entire regiment in larger scale games, with the addition of the second battalion's command stand. 

I clipped off the flag and pole cast as part of the standard bearer figure. It was easily replaced by a short bit of .015" galvanized steel wire. I made the pole a bit taller than it really ought to be, just as my printed standards are a bit bigger than true 1/600 scale. These little guys benefit greatly from an extra bit of eye-catching "bling" and slightly over-sized standards on extra tall poles really help with that, as well as aiding in identifying the standard at arm's length. 

As with the supernumeraries at the back of each company, my command stand figures aren't intended to be historically correct in either number or placement. They're purely for decoration, given that the standard itself is the actual point of the stand. 

These white uniformed, bicorne wearing infantry with red facings can easily represent Saxons, Spaniards, Dutch, French in the short-lived 1806 uniform, and possibly early Italians, so separate command stands facilitate this interchangeability. 

More from me next time!

Saturday, December 13, 2014

My first 3mm Napoleonics!

I've finished my first stand of 3mm Napoleonics: 1806 Saxon (or 1808 Spanish) infantry:

They're mounted on a 40x20 steel base. I was torn about how to present them. By companies? Battalions? Whole regiments? Or even brigades?  In the end, I decided to give myself some flexibility. Each stand can represent a company, allowing me to depict units in a square, etc., and I can put four on a sabot base to field battalions or in larger scale games, each stand can be a battalion in its own right. For a company, it's about 2:1 and for a battalion, it's about 10:1. To expand the possible combinations, I'll do command stands separately so that the standards don't tie the units to just one identity. They can depict any nationality that the uniform is appropriate for simply by changing command stands.

Before anyone starts crying "burn the witch!!" and "heretic!!",
I am well aware that the supernumeraries I have at the back of the stand are not historically correct in either number or position. I put them there simply as a bit of window dressing to make the stand more attractive. 

Onward to my first command stand!

"And how do you know that she is a witch?" "She turned me into a newt!!.....I got better"

Wednesday, December 10, 2014

This is moving right along!

I've about finished my first few 3mm Napoleonic Saxons. Given that these things are really too tiny to paint in a traditional, straight-forward "miniature painting" style, I've elected to go with the Kandinsky method of Impressionism:
That's his "Autumn in Bavaria". It's not a landscape, but it gives that impression. 

Not really soldiers, but painted to give the impression of soldiers:
Up close, and I do mean CLOSE, they appear fairly messy. However, from a gaming distance, they look quite good, if I do say so myself:
It all blends together well at this distance. 

Black was far too dark for things that ought to be black, so I used Vallejo Basalt Grey (869). Dark enough, but not too dark. Facings and pompon in electric red to give a bit of "bling" to catch the eye. 

I must say, heavy dry-brushing certainly goes faster than actual painting! Now I have to set about shrinking down a Saxon standard from a 6mm template. More on all of this shortly!


Monday, December 8, 2014

Oh my God, these are tiny!!!!

Today the U.S. Post Office finally deigned to deliver my 3mm Napoleonics from Picoarmor.

Holy Hell, these things are tiny for real! Quite some time ago, I ordered the American Civil War sample pack, just to have a look. Those figures are small, around 4mm I'd guess, but these Napoleonics are smaller yet. They really are 3mm. 

The first step has been to lightly glue them to popsicle sticks and prime them a light grey, then give them a fairly heavy black wash:
Sorry, I don't yet have a macro lens for the new iPhone 6.

Next up is a heavy dry-brushing in the main uniform color. These got three coats of white (the black wash bleeds through too much on the first two), as they will serve as both Saxons and Spaniards. At this tiny scale, only their command stands and standards will set them apart, so it seems a nice plus to be able to use them as any white-uniformed bicorne-wearing infantry:
Now I just need to pick out a few details, bicornes, muskets & bayonets, faces, etc and this first lot is finished! Wow! These things paint FAST, as long as you don't get too anally-retentive about it. After all, they're going to be seen en-masse from four or five feet away. 

Stay tuned for more as this progresses!

Saturday, September 7, 2013

Desert bases, plus odds and ends

Another weekend is upon me and my shipment from Picoarmor arrived, as well as one from Heroics & Ros, which included a very cool Timecast 6mm German church.
That's the painting supervisor and head of security in the first photo. 

My Picoarmor order included Italian M13/40's, Bersaglieri infantry, British QF 2pdr anti-tank guns, and French 25mm Hotchkiss anti-tank guns, which the Italians used in some numbers in North Africa. It seems appropriate to talk about how I go about making my desert bases. 

I start off with a thin metal base from Wargame Accessories and glue down anything that has it's own base, then I prime it. 
These are the Hotchkiss 25mm's. Anything that doesn't have it's own base will sit on top of the finished sandy base, not be imbedded in it. Now I liberally coat the base with undiluted PVA glue (Elmer's). 
Then I use an old paint brush to push the glue evenly around the base, making sure it's right up to the edges of the miniatures. 
After a new house was built across the street from my apartment, the builders very kindly didn't think it was worth their time to scoop up the little leftover piles of fine sand they'd used to mix their cement, bless their hearts. So I took one of Mrs. History PhD's Tupperware containers and filled it up (kids, always ask your wife's permission before doing this!). I threw in a small handful of cat litter (unused, needless to say!!) and that's my desert material. 
Now I pour a handful over my glued base
And this is what I end up with. As it dries, little gaps open up in the glue/sand mixture, so I fill them in with a touch more glue/sand. Normally, I'd pretty much leave that alone, but as you can see, the bases of the miniatures have to be painted a color that more or less matches the rest of the larger base, which isn't easy because no paint is a good match. Here are some Italian 47mm anti-tank guns:
That necessitates a lot of dry brushing with various different shades of sand, a touch of light gray, and very watered-down patches of pale rust, in an effort to get everything to blend together.
It's a whole lot easier to do bases where the vehicles have no molded-on base of their own and simply sit on top of the sand. A little bit of dark brown earth flock or burnt grass flock and maybe a pale green bush and that's it!

Those are my shirtless Italian anti-tank gunners. A spray with Dullcote and I'm finished. If anyone has more attractive/realistic desert bases, I'd love to know because I'm not 100% satisfied with mine. 

And just to show that I'm not a "one trick pony", here are some Adler 6mm 1806 Saxons I've finished. Dragoons:
Hussars:
And a battalion of infantry:
I haven't textured or flocked the bases yet though. They're based for Baccus' Polemos rules. And a Saxon general who's finished:

That's it for this weekend!